Welcome to my blog about making molds. My name is Alex and I am a sculptor, ceramist, and mold maker working near Santa Fe, NM. I created this blog to promote my side-business making plaster molds for other clay artists. Please contact me if you need some made.


Architecture of Process

Some molds need multiple parts so the cast object isn't trapped inside. Designing the parts requires sculpting a temporary clay dam around the object to contain the plaster while it transforms from liquid to solid. Once the plaster has hardened the clay is removed and recycled into another temporary functional sculpture / micro architectural space. I really enjoy this part of the process and thought I'd share:

 This is my favorite so far. Coddle form dome spaceship.

 The next step complete: plaster poured (frosted, actually).

The resulting part.


 This makes me think of a science fiction book I read years ago. Space traveling beings that built everything with mud. Organic architecture. Mixed with Noah's Ark, mid construction.


Recent work: mold maker 2015

The following pictures of molds I have made for other artists in the last couple months. I try to keep these patrons anonymous and take photos that showcase the molds and not their work.

 Probably my favorite mold from this current batch. Fun and challenging to make. 
I tape the molds together while they are drying out.

Exploded view of mold pictured below


This is a mold of a jar.

Different view of same mold pictured above.


Process of making a mold of a lid. The angle of the opening in the handle made for some tricky seam sculpting.


The mold of above process photo.


Exploded view of mold of a lid for jar.


 This is a pretty big mold about 16 inches in diameter. It was designed for press molding and does not have an appropriate spare, or pour gate as I was taught to call it, for slip-casting.


Exploded view of above mold.
You can really see the scratches in my camera! 


Wall o' Molds


For years I have been hoarding tile molds I've made for various projects with the intention of one day building a house and plastering a room with molds (I have a lot!). That dream is a ways off, but I thought I'd go for a preview in my current studio. Introducing: Wall of molds. How much longer will I have to schlep these things around??

Process of making a plaster mold

Whenever I am making a mold I treat it like I was making a sculpture. It's important to me that the mold as a whole, and each individual part of it is a beautiful object. Hey, it might be in a museum one day, it's got to look good! Like a mug, they need to be designed to function well. That engineering of form and function is a fun challenge. I sign my own molds as works of art in themselves, but when I make molds for other people, I forgo that and just hope whomever is using the molds appreciates it as a beautifully crafted tool.


 These photos document the process of making a mold for The Odyssey mural. These molds were made in 2011 and were my first big wave of molds--about 60 were made for the project. I happen to have these nice photos thanks to Frank Bott. These are representative of the molds I make now, however I feel compelled to say that I've had a lot of practice since then and I make 'em even nicer now. I've also had a lot hair cuts since then too.

What you are looking at here is one of very many tiles that make up a larger repeating pattern. The coddle boards are shown with the addition of some clay to make a curved wall that has an even thickness. Very rarely do I make a square mold anymore, unless it's very small. Molds get heavy and keeping the plaster about 1 1/2 inches thick everywhere keeps them light. It also makes for a more sculptural mold with lots of sexy curves.


 Pouring the plaster. I always weight out plaster and water for consistent density. This doesn't matter so much with my own work (one-piece press-molds), but it's a good habit to stay in when making multiple part molds for other artists that will be slip-casting.


 Frosting the plaster: the technique of applying it by hand or with a tool like frosting a cake. This mold is a good example of using both methods of pouring and frosting. I often incorporate both, especially with larger molds to keep the wall thickness even and light weight.


Smoothing out the bottom. Once the plaster is frosted, I will quickly smooth out the lumpy surface before it hardens.


 Very soon, the plaster is set up and a surform is required to continue smoothing. Not pictured in this process is an additional level of finishing with a metal rib to remove surform marks. I try to make the molds as nice as possible.


 Removing the prototype. I model originals in clay and they are usually destroyed at this stage in the process. No big deal -- I can crank out copies now quickly. I also make molds of hard objects (ceramic, metal, etc. ) and can usually save the original if necessary.


Finishing the outside of the mold.


 Cleaning up the inside of the mold.


Final step: cleaning up plaster and clay residue. Done. Molds are left to dry out for about a week and then are ready to use.

So that was the process of making one of the molds for The Odyssey. Above is a pic of the other molds made for that project.

 BONUS!
I thought I'd go ahead and give you a peak at how the molds went on to be used:
Here are the molds laid out. I wouldn't make so many for one project again. Live and learn.


The tiles were press-molded, usually all the way up to the top of the mold, but in this picture shows some tiles being made with a slanted back. 


The three courses of tile on the left came out of molds like the photo above. The deeper tiles on the right were similarly made but used the entire depth of the mold.


Table o' unfired tiles. 


Floor o' fired tiles.


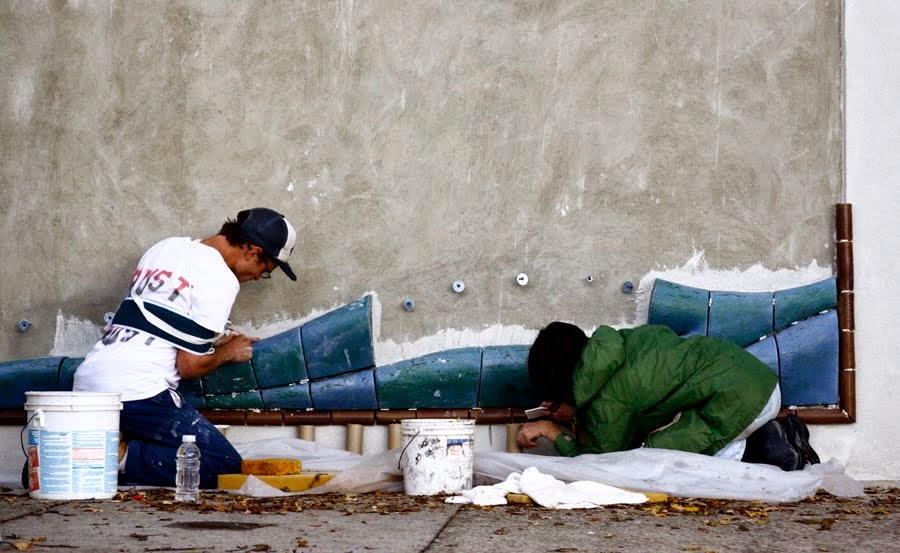
Tile installation with Kathy (and broken collarbone).


The Odyssey
2011
Alex Irvine and Kathy Triplett 


PRICING

Pricing for custom plaster molds is tricky. I'm trying to get paid fairly and give you an excellent product at an acceptable price. Every mold is different and some shapes are faster to mold than others.

Having said all that I have been working on a pricing formula. It goes about like this:
$125 / mold part. That price is subject to go up or down depending on size. If it's small enough that I can just pour the plaster then I charge $100 per part. If it's larger and can only be frosted then $150 per part might be appropriate. That includes cost of plaster.

And then there is the bulk discount. If someone is hiring me to make a bunch of molds I am willing to cut them a break. Hey, finally, some job security! In that case I've recently been doing what should be more expensive molds for $100 per part.

For example:
 This 3-part mold was made for $300. It is one of about 25 molds someone is hiring me to make. It ended up taking longer than I thought and I feel like it should probably cost $450 like my formula would suggest (every part of this was frosted). But they are paying me to make so many others that I kept it affordable. And hey, I sure am glad to be working in my shop and not job hunting!

Like I said, pricing molds is tricky. I try to make $25/hr when I'm making the mold. That doesn't include time spent talking with customers, gathering materials, etc. I come up with a quote with that wage in mind and honor it. Often, unforeseen challenges make it take longer than expected and in those instances I still honor the quote.

MODEL MAKING
I can also be your personal 3-D printer. Send me a sketch and I can sculpt it and then make a mold of it. This is also tricky to price but in my mind goes something like, "Well, I think I could do that in 3 days, so 3 x 200/day = $600."

SHIPPING
I double-box molds like you would ship fine art and haven't had any problems with mold arriving in the same condition they left the shop. Obviously, the size of the mold will determine the cost of shipping. Expect to pay about $80 to ship an average size mold (that could cast a tea kettle sized object) half way across the country. I tape the mold together so the parts don't vibrate. I try to have 2 inches of bubble wrap around the mold, with an additional 2 inches of bubble wrap to the walls of the inner box. The inner box is at least 2 inches smaller in every dimension than the outer box. Between the two I use biodegradable packing peanuts. I am at high elevation and supposedly the air in bubble wrap shrinks a little at lower altitudes. I still use it around the mold because it stays put, but I use peanuts when appropriate.

ABOUT THE MOLD MAKER

Hello, and thanks for checking out my new blog. My name is Alex and I am passionate about ceramics, public art, skateboarding, and my girlfriend Mary ;). In the art world, I tend to work in two veins: hand-built figurative sculpture mixed with press-molded tile patterns. The latter has required a lot of plaster mold making, which in time became something I love to do. Primarily I try to do public art commissions, but that work isn't yet steady and in those in between times I fall back on a myriad of skill sets. More and more that has become making molds for other clay artists. Believe it or not, I actually like making molds, which is only funny because it seems like most other people don't. For me, this fill-in work is fun and most importantly keeps me in the studio, and pays for a roof over my head when I'm not getting paid to make my own art. I've been sporadically making molds for other people the last 5 years. In that time I have made hundreds of molds for myself and other artists. Usually it's for people that are local, but upon moving from North Carolina to New Mexico, I have started shipping molds too. I am grateful to have this kind of work and hope you will contact me if you need some molds made. If I'm not in the middle of a big commission, I would be stoked to accommodate you.